안녕하세요
요즘은 매일 OpenCvSharp 포스팅 자료 만들기 하는냐고 하루가 다 가는거 같네요
인터넷을 보고 따라하고 분석하고 오류 수정하고
그러고 실행해서 결과 분석하고 그 과정을 캡쳐 캡쳐 하여 포스팅 준비를 합니다
제 글을 보시는 분들이 작은 정보를 하나라도 더 알아가시게 하기 위해 노력합니다ㅎㅎ
(광고 눌러달라고 구걸하는 겁니다ㅋㅋㅋ)
이번 포스팅 역시 기존 포스팅들과 연계되어 진행 되니 처음 오신분들이나 이해가 잘 되지 않는 분들은
첫 포스팅 부터 읽어 보시기 바랍니다
https://codingman.tistory.com/49
[C#]OpenCvSharp 라이브러리 사용하기 #1
안녕하세요 저번 포스팅에 C#으로 OpenCvSharp 라이브러리를 등록하여 구현하는 포스팅을 준비하던중에 OpenCv 3,4 버전에서 오류가 발생하는 문제가 있다는 얘길 듣고 부랴부랴 포스팅 내용을 검토해봤는데 역시..
codingman.tistory.com
이번 포스팅은 컨투어 찾기인데요
원본 이미지의 윤곽선을 검출하거나 또는 라인을 그려서 Depth별 윤곽선을 찾아서 그릴수 있는데요
이번 포스팅에서 이러한 여러가지 검출 방법을 하나씩 구현해 보도록 할께요
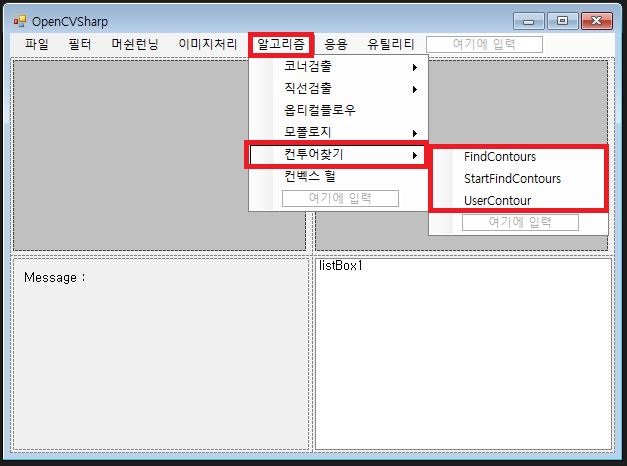
언제나 그렇듯 실행을 위한 메뉴 구성 부터 해볼께요
[디자인]
- 메뉴 항목에 다음과 같이 메뉴를 생성합니다
(매번 추가하는 작업이라 이제 대충 설명할께요ㅎ)

- 전에 하듯이 메뉴별 클릭 이벤트를 생성합니다
[Source Code]
        private void findContoursToolStripMenuItem_Click(object sender, EventArgs e)
        {
            //FindContours를 통한 2단계 계층 구성 방법
            if (src == null) return;
            using (FindContours Sq = new FindContours())
            using (IplImage temp = Sq.Contour(src))
            {
                result = temp.Clone();

            }
            pictureBoxIpl2.ImageIpl = result;
        }

        private void startFindContoursToolStripMenuItem_Click(object sender, EventArgs e)
        {
            //StartFindContours를 통한 모든 컨투어 검색 구성 방법
            if (src == null) return;
            using (FindContours Sq = new FindContours())
            using (IplImage temp = Sq.Contour(src))
            {
                result = temp.Clone();

            }
            pictureBoxIpl2.ImageIpl = result;
        }

        private void userContourToolStripMenuItem_Click(object sender, EventArgs e)
        {
            //단계별 Line을 그려서 윤곽을 구성하는 방법
            using (contour Ct = new contour())
            using (IplImage temp = Ct.FindContours())
            {
                result = temp.Clone();

            }
            pictureBoxIpl2.ImageIpl = result;
        }
- 해당 메뉴들별로 하는 일을 똑같이 윤곽선 검출 입니다
- 하지만 기능별로 검출 방식이 약간식 차이가 있으니 잘 확인하시기 바랍니다
- 클래스 생성
(각 기능별 클래스를 생성합니다)
*FindContours
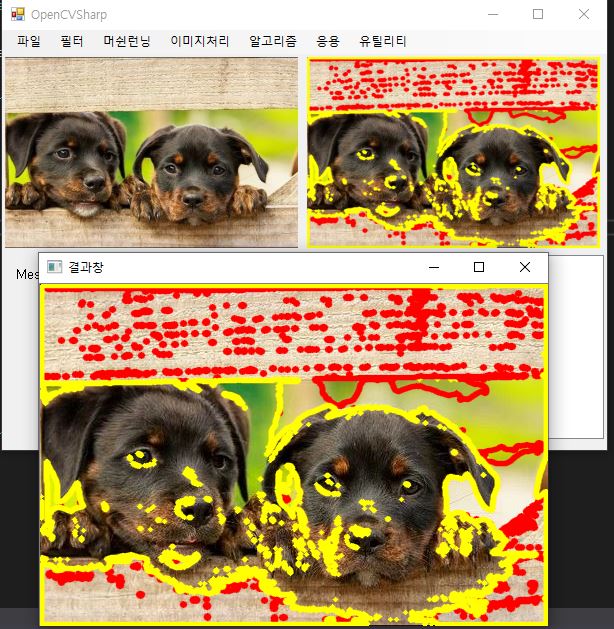
- FindContours 함수를 사용하여 2단계 Depth까지 윤곽선을 검출 하는 방식
[Source Code]
using System;
using System.Collections.Generic;
using System.Linq;
using System.Text;
using System.Threading.Tasks;
using OpenCvSharp;

namespace OpenCV_V1
{
    class FindContours : IDisposable
    {
        IplImage bin;
        IplImage con;

        public IplImage Binary(IplImage src)
        {
            bin = new IplImage(src.Size, BitDepth.U8, 1);
            Cv.CvtColor(src, bin, ColorConversion.RgbToGray);
            Cv.Threshold(bin, bin, 150, 255, ThresholdType.Binary);
            return bin;
        }

        public IplImage Contour(IplImage src)
        {
            con = new IplImage(src.Size, BitDepth.U8, 3);
            bin = new IplImage(src.Size, BitDepth.U8, 1);

            Cv.Copy(src, con);
            bin = this.Binary(src);

            CvMemStorage Storage = new CvMemStorage();
            CvSeq<CvPoint> contours;

            Cv.FindContours(bin, Storage, out contours, CvContour.SizeOf, ContourRetrieval.List, ContourChain.ApproxNone);

            Cv.DrawContours(con, contours, CvColor.Yellow, CvColor.Red, 1, 4, LineType.AntiAlias);

            Cv.ClearSeq(contours);
            Cv.ReleaseMemStorage(Storage);

            return con;
        }

        public void Dispose()
        {
            if (bin != null) Cv.ReleaseImage(bin);
            if (con != null) Cv.ReleaseImage(con);
        }
    }
}
*StartFindContours
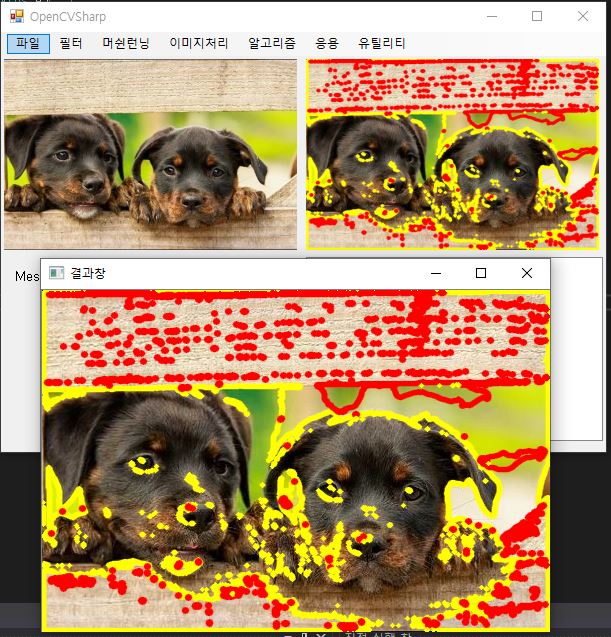
- StartFindContours 함수를 사용하여 단일 윤곽선을 검출하여 while문을 사용하여 모든 윤곽선을 검출하는 방법
[Source Code]
using System;
using System.Collections.Generic;
using System.Linq;
using System.Text;
using System.Threading.Tasks;
using OpenCvSharp;

namespace OpenCV_V1
{
    class MultFindContours : IDisposable
    {
        IplImage bin;
        IplImage con;

        public IplImage Binary(IplImage src)
        {
            bin = new IplImage(src.Size, BitDepth.U8, 1);
            Cv.CvtColor(src, bin, ColorConversion.RgbToGray);
            Cv.Threshold(bin, bin, 150, 255, ThresholdType.Binary);
            return bin;
        }

        public IplImage Contour(IplImage src)
        {
            con = new IplImage(src.Size, BitDepth.U8, 3);
            bin = new IplImage(src.Size, BitDepth.U8, 1);

            Cv.Copy(src, con);
            bin = this.Binary(src);

            CvMemStorage Storage = new CvMemStorage();
            CvSeq<CvPoint> contours;

            CvContourScanner scanner = Cv.StartFindContours(bin, Storage, CvContour.SizeOf, ContourRetrieval.List, ContourChain.ApproxNone);

            // #1
            while (true)
            {
                contours = Cv.FindNextContour(scanner);

                if (contours == null) break;
                else
                {
                    Cv.DrawContours(con, contours, CvColor.Yellow, CvColor.Red, 1, 4, LineType.AntiAlias);
                }
            }
            Cv.EndFindContours(scanner);

            // #2
            //foreach (CvSeq<CvPoint> c in scanner)
            //{
            //    con.DrawContours(c, CvColor.Yellow, CvColor.Red, 1, 4, LineType.AntiAlias);
            //}
            //Cv.ClearSeq(contours);

            Cv.ReleaseMemStorage(Storage);

            return con;
        }

        public void Dispose()
        {
            if (bin != null) Cv.ReleaseImage(bin);
            if (con != null) Cv.ReleaseImage(con);
        }
    }
}
*UserContour
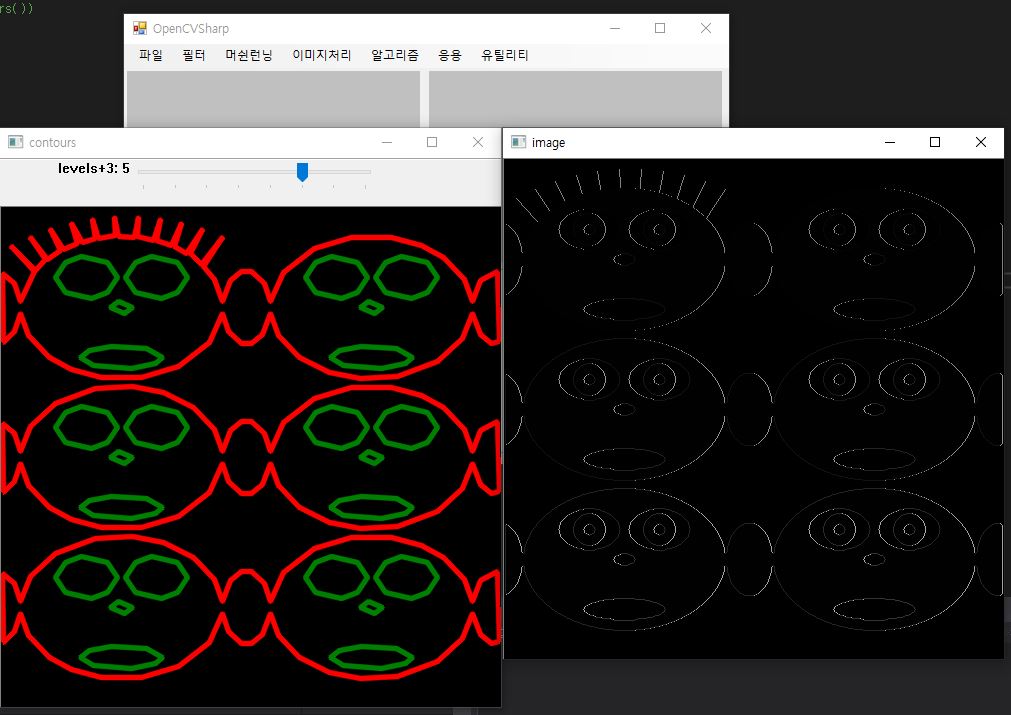
- 사용자가 임의 라인을 생성하여 3 Depth까지의 윤곽선을 검출하는 방법
[Source Code]
using System;
using System.Collections.Generic;
using System.Text;
using OpenCvSharp;

namespace OpenCV_V1
{
    class contour : IDisposable
    {
        IplImage cont;
        public IplImage FindContours()
        {
            // cvFindContoursm cvDrawContours
            // 화상중으로부터 윤곽을 검출해,-1~+1까지의 레벨에 있는 윤곽을 그린다

            const int SIZE = 500;

            using (IplImage img = new IplImage(SIZE, SIZE, BitDepth.U8, 1))
            {
                // 화상의 초기화
                img.Zero();
                for (int i = 0; i < 6; i++)
                {
                    int dx = (i % 2) * 250 - 30;
                    int dy = (i / 2) * 150;
                    if (i == 0)
                    {
                        for (int j = 0; j <= 10; j++)
                        {
                            double angle = (j + 5) * Cv.PI / 21;
                            CvPoint p1 = new CvPoint(Cv.Round(dx + 100 + j * 10 - 80 * Math.Cos(angle)), Cv.Round(dy + 100 - 90 * Math.Sin(angle)));
                            CvPoint p2 = new CvPoint(Cv.Round(dx + 100 + j * 10 - 30 * Math.Cos(angle)), Cv.Round(dy + 100 - 30 * Math.Sin(angle)));
                            Cv.Line(img, p1, p2, CvColor.White, 1, LineType.AntiAlias, 0);
                        }
                    }
                    Cv.Ellipse(img, new CvPoint(dx + 150, dy + 100), new CvSize(100, 70), 0, 0, 360, CvColor.White, -1, LineType.AntiAlias, 0);
                    Cv.Ellipse(img, new CvPoint(dx + 115, dy + 70), new CvSize(30, 20), 0, 0, 360, CvColor.Black, -1, LineType.AntiAlias, 0);
                    Cv.Ellipse(img, new CvPoint(dx + 185, dy + 70), new CvSize(30, 20), 0, 0, 360, CvColor.Black, -1, LineType.AntiAlias, 0);
                    Cv.Ellipse(img, new CvPoint(dx + 115, dy + 70), new CvSize(15, 15), 0, 0, 360, CvColor.White, -1, LineType.AntiAlias, 0);
                    Cv.Ellipse(img, new CvPoint(dx + 185, dy + 70), new CvSize(15, 15), 0, 0, 360, CvColor.White, -1, LineType.AntiAlias, 0);
                    Cv.Ellipse(img, new CvPoint(dx + 115, dy + 70), new CvSize(5, 5), 0, 0, 360, CvColor.Black, -1, LineType.AntiAlias, 0);
                    Cv.Ellipse(img, new CvPoint(dx + 185, dy + 70), new CvSize(5, 5), 0, 0, 360, CvColor.Black, -1, LineType.AntiAlias, 0);
                    Cv.Ellipse(img, new CvPoint(dx + 150, dy + 100), new CvSize(10, 5), 0, 0, 360, CvColor.Black, -1, LineType.AntiAlias, 0);
                    Cv.Ellipse(img, new CvPoint(dx + 150, dy + 150), new CvSize(40, 10), 0, 0, 360, CvColor.Black, -1, LineType.AntiAlias, 0);
                    Cv.Ellipse(img, new CvPoint(dx + 27, dy + 100), new CvSize(20, 35), 0, 0, 360, CvColor.White, -1, LineType.AntiAlias, 0);
                    Cv.Ellipse(img, new CvPoint(dx + 273, dy + 100), new CvSize(20, 35), 0, 0, 360, CvColor.White, -1, LineType.AntiAlias, 0);
                }

                // 윤곽의 검출
                CvSeq<CvPoint> contours;
                CvMemStorage storage = new CvMemStorage();
                // native style
                Cv.FindContours(img, storage, out contours, CvContour.SizeOf, ContourRetrieval.Tree, ContourChain.ApproxSimple);
                contours = Cv.ApproxPoly(contours, CvContour.SizeOf, storage, ApproxPolyMethod.DP, 3, true);

                // wrapper style
                //img.FindContours(storage, out contours, ContourRetrieval.Tree, ContourChain.ApproxSimple);
                //contours = contours.ApproxPoly(storage, ApproxPolyMethod.DP, 3, true);

                // 윈도우에 표시
                using (CvWindow window_image = new CvWindow("image", img))
                using (CvWindow window_contours = new CvWindow("contours"))
                {
                    CvTrackbarCallback onTrackbar = delegate (int pos)
                    {
                        IplImage cnt_img = new IplImage(SIZE, SIZE, BitDepth.U8, 3);
                        CvSeq<CvPoint> _contours = contours;
                        int levels = pos - 3;
                        if (levels <= 0) // get to the nearest face to make it look more funny
                        {
                            //_contours = _contours.HNext.HNext.HNext;
                        }
                        cnt_img.Zero();
                        Cv.DrawContours(cnt_img, _contours, CvColor.Red, CvColor.Green, levels, 3, LineType.AntiAlias);
                        window_contours.ShowImage(cnt_img);
                        cont = cnt_img.Clone();
                        cnt_img.Dispose();
                    };
                    window_contours.CreateTrackbar("levels+3", 3, 7, onTrackbar);
                    onTrackbar(3);

                    Cv.WaitKey();
                }
            }
            return cont;

        }
        public void Dispose()
        {
            if (cont != null) cont.Dispose();
        }
    }
}
- 각 윤곽선 검출 방법별로 결과를 확인 합니다
[결과 창]
*FindContours

*StartFindContours

*UserContour

'코딩정보 > OpenCv' 카테고리의 다른 글
| [C#] OpenCvSharp 포인트를 찾아 영역 지정 하기 (0) | 2020.01.09 |
|---|---|
| [C#] OpenCvSharp 이미지 사각, 원형 검출하기 (2) | 2020.01.09 |
| [C#] OpenCvSharp 사용자 지정 마스크 사용하기 (0) | 2020.01.08 |
| [C#] OpenCvSharp 이미지 모폴로지 연산 처리하기 (0) | 2020.01.07 |
| [C#] OpenCvSharp 이미지 옵티컬플로우 처리하기 (0) | 2020.01.07 |


